|
This page is intended to supply information for Ten Tec PTO repair and greasing instructions, which are no longer available from Ten Tec. While the replacement parts kit for the PTO is no longer available, partial disassembly and lubrication will often restore operation as good as new. I will specifically cover the OMNI 546 and Corsair, but the information may be helpful in similar rigs.
The Ten Tec Corsair (preceded by the OMNI 546) was long popular among serious contesters. Its performance ranks as a next door neighbor to the Collins R-390 in the Sherwoood receiver test data. The CW is fast full break in. The SSB is silky smooth and a good mike will get many compliments on audio. I was lucky to obtain a fully loaded (all options and filters) Corsair and a nice OMNI B after I traded up from my Heathkit SB-104. This page will document how I refurbished both radios and their accessories, including the OMNI 243 External VFO, which had a ground breaking dual receive feature. The Ten Tec Corsair improved on the 243 with a "BLEND" control that worked as a dual receive (on both transmit and receive frequencies) for split frequency DX work. Its all American made, and is a classic worth rebuilding. I will furnish here details not included in the available manuals. There will be lots of photos to guide you. If you rebuilt a carburetor, you can do this too. The 546 OMNI and Corsair user's manuals are still available on the Ten Tec website. Ten Tec has done a sterling job in supporting these classic radios long after the competition would have written them off. There is a reason for the kind of loyalty Ten Tec owners passionately exhibit.
PLEASE NOTE:
- I am retired. I do not do repair for others.
- Ten Tec does not have the parts kit any more for these obsolete rigs.
- Neither do I. You might find a machine shop to make the brass parts if yours are worn out.
- Use this material at your own risk to make your Ten Tec PTO turn freely again.
- I will not answer questions about grease.There is a lot of info on the internet about it, and much of it is contradictory.
- You decide what is best for you, please don't ask me questions about grease or parts availability. If you are not comfortable with complicated mechanical work with small parts, get someone local to help you. Its too bad Ten Tec does not repair these any more. You used to be able to remove the PTO and send it to them on an exchange basis for a rebuilt one.
- With patience, YOU can do this job. I advise that you do not take shortcuts like spraying WD-40 into the PTO. It may damage brass parts, and the solvents are not good for plastics either. I do have a trick you can use to grease the PTO metal parts WITHOUT total disassembly. It stops before the reassembly gets too challenging.
- There is no point in complete disassembly if you do not have the replacement parts. In most cases, this will be sufficient to restore proper operation.
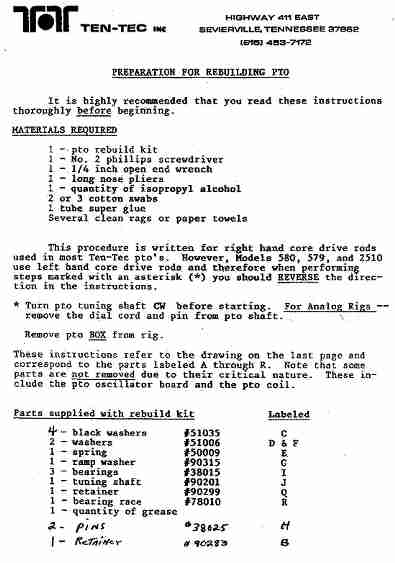
- Here are the original Ten Tec PTO rebuild pages that came with the repair kit.
- If the PTO is frozen, do not force it to turn or you will cause more wear. On the frequency its stuck at, check basic receive and transmit with a dummy load and a signal generator to determine if electronic repair is needed. Decide if you want to invest the work in the rig before beginning.
These comments apply to a PTO from an OMNI or Corsair. I do not know if they apply to any other Ten Tec gear, but probably they will be useful if you take your specific radio into account. I did this to mine, without replacing ANY parts, and it worked fine. I suspect most PTOs will be OK unless subject to extremely high wear.
Refer to page 1 below, the instructions on how to remove the PTO from the radio. These comments expand on the Ten Tec instructions found there.
- When you remove the vox board, do not lose the screw and spacer, put the nut back on after the board is out.
- Do NOT cut the insulator paper inside the radio. Peel it off and remove it. Later, you can cut it to exact size without risk to the wires. Simply put the insulation back with new glue before you reinstall it in the radio.
- I just reinstalled the vox board with one of the control nuts to hold it in place til I was done with the PTO.
- Be VERY careful to not lose the screws in the cross brace, counter assembly, or audio filter.
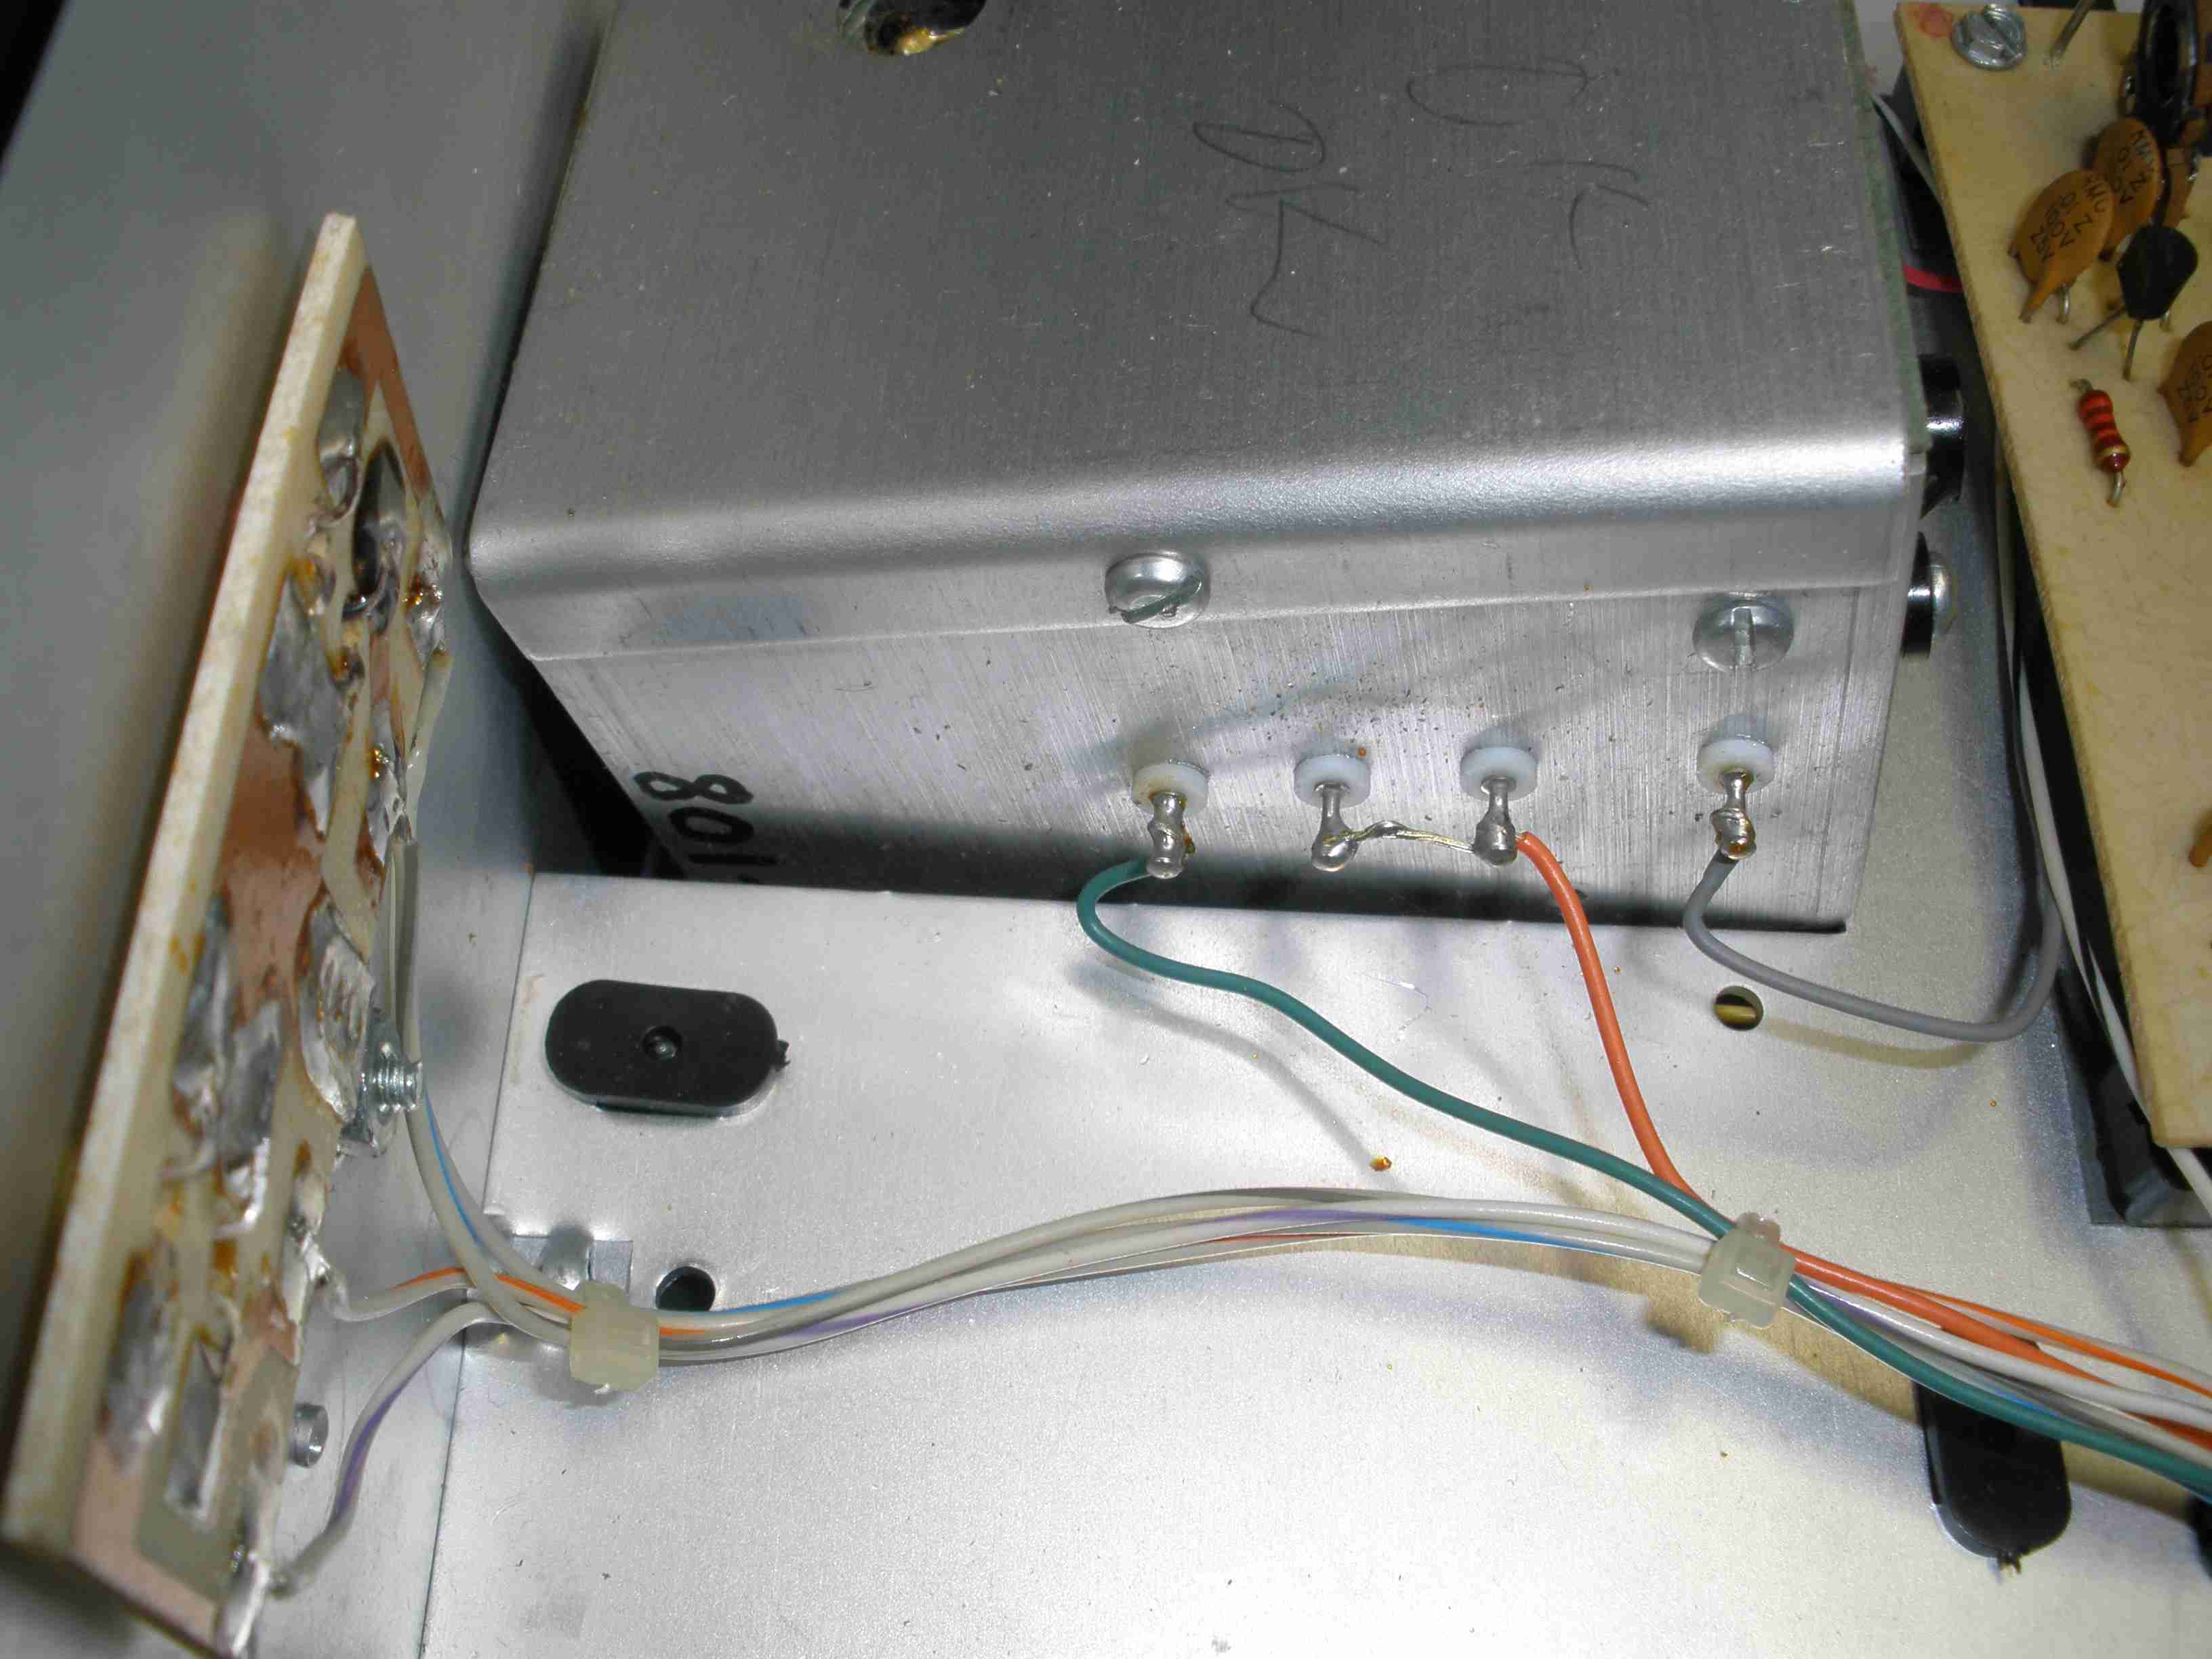
- Make a drawing showing the colors of the wires to the PTO. Be careful to not melt the insulation. These wires are wrapped multiple times around the feed through post. Its a PITA to get them off the PTO.
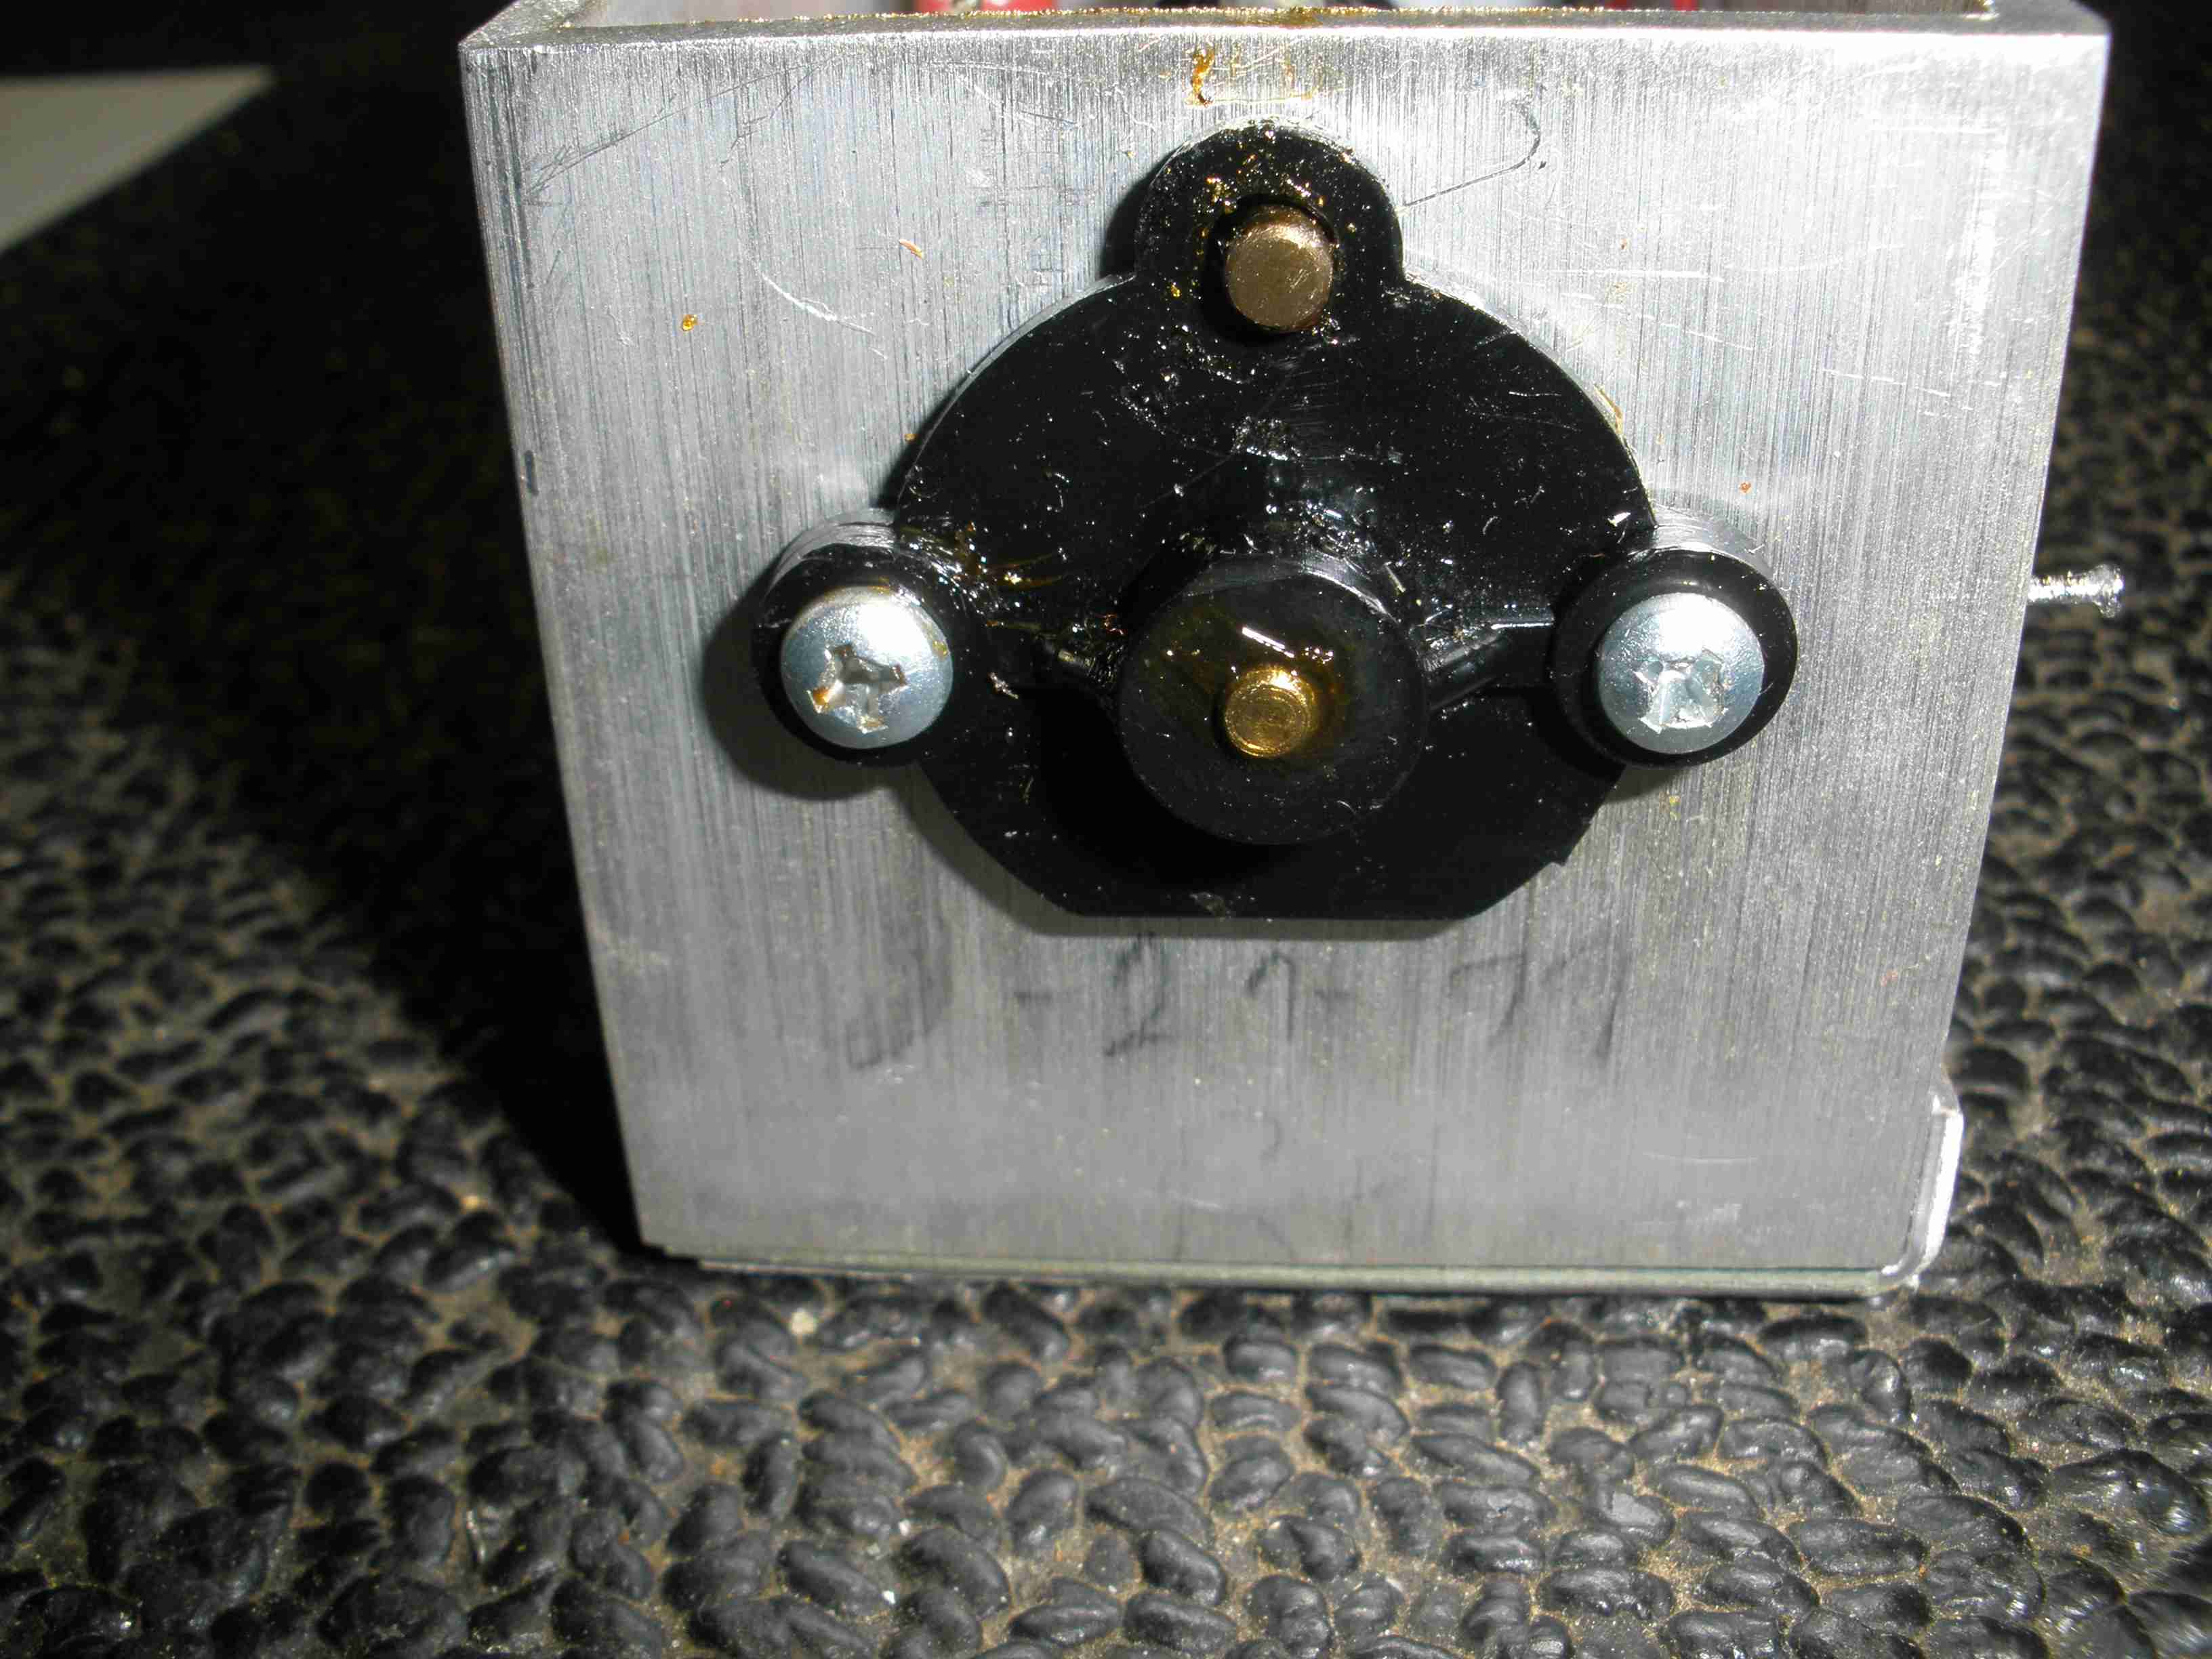
 Wire colors and removal from 243 Wire colors and removal from 243 Rear cap installation Rear cap installation Dowel Pin (H) must be removed to disassemble Dowel Pin (H) must be removed to disassemble
Reinstall this for 243 or analog radio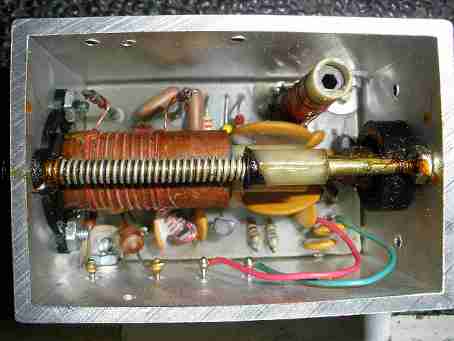 View of 243 internally View of 243 internally
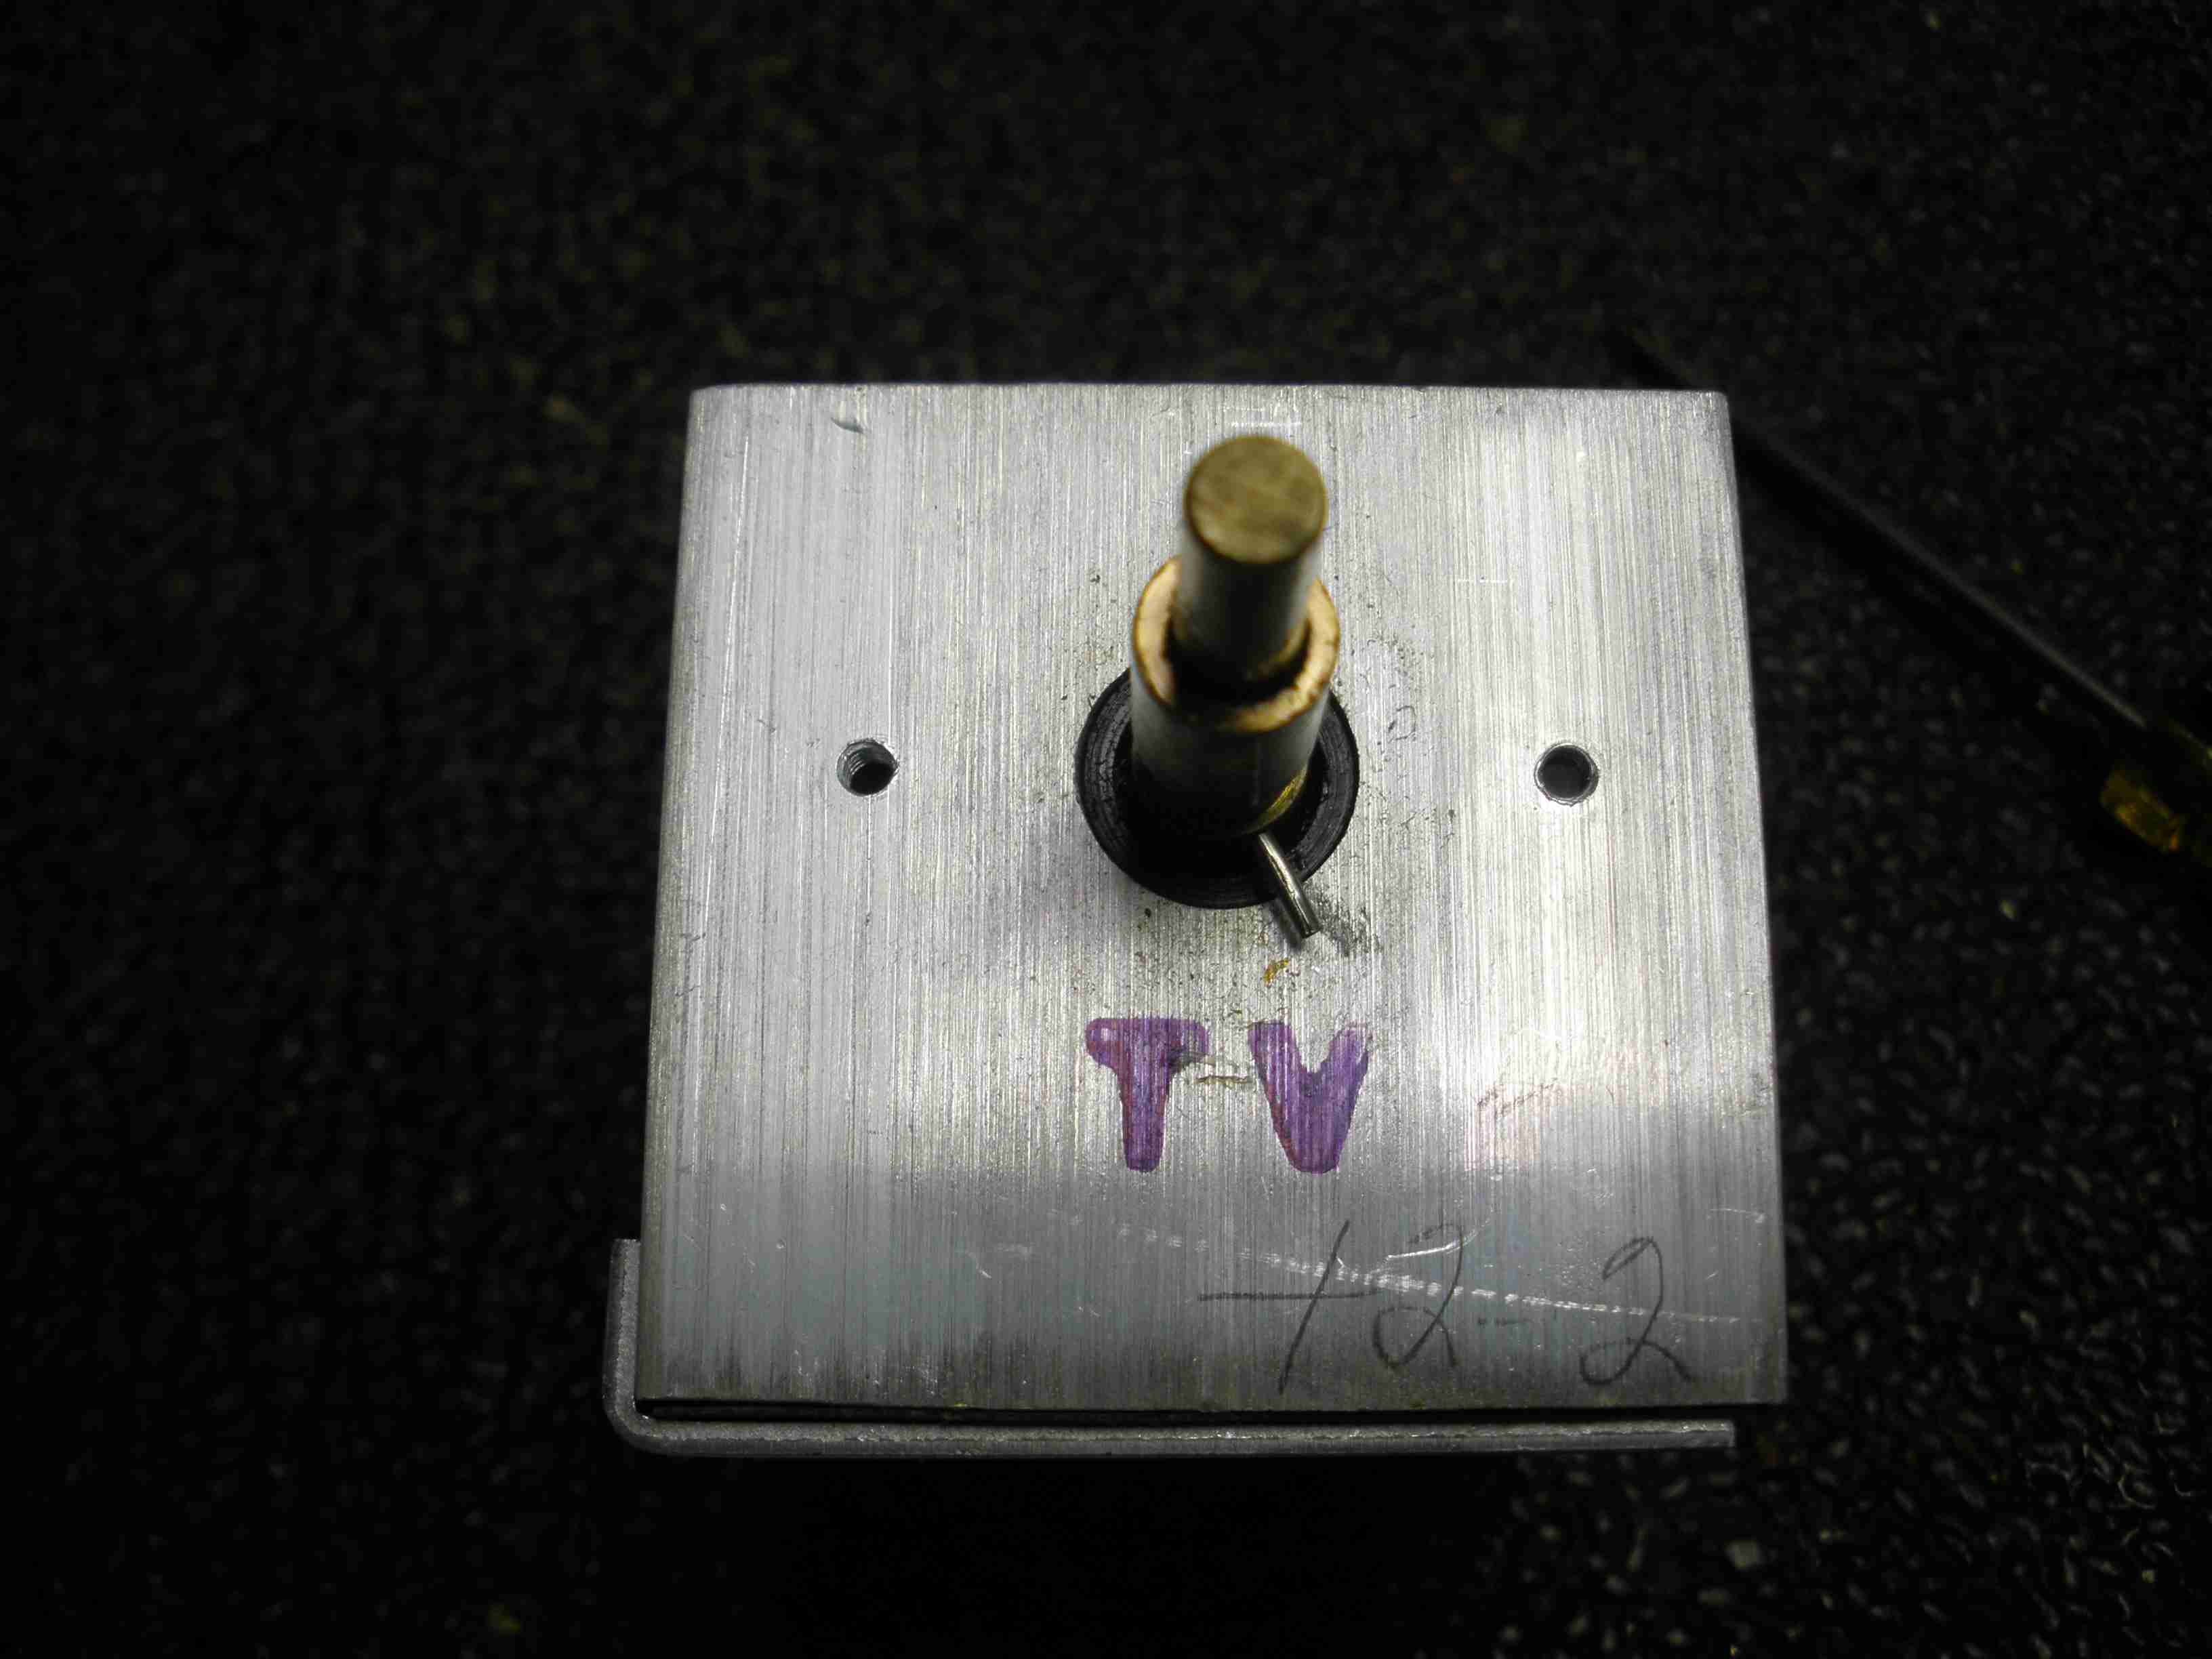
Note slug position.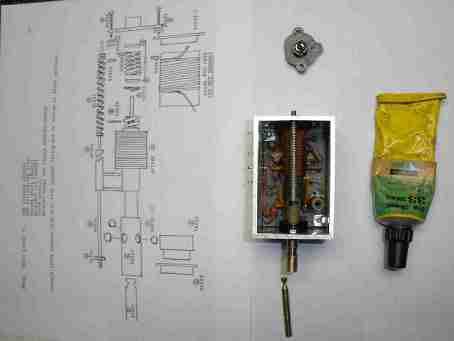 PTO and instructions PTO and instructions
with tuning shaft and rear cap removed
DO NOT DISMANTLE FURTHER! Dial cord installation 243 and analog radio Dial cord installation 243 and analog radio
(click to enlarge)
Page 5 will guide you on identifying the parts as you disassemble and reassemble the PTO. Page 2 is the start of the disassembly instructions. Follow them carefully. I provide notes keyed to those sheets below, with my method.
Put the PTO in a 2 inch deep 9 X 13 inch baking pan to contain all the parts while you work. Do this job on a smooth concrete basement or linoleum floor, not a carpet. If you drop something, and you will, it will be easier to find it. If you drop something, use a flashlight held parallel to the floor to cast a shadow to make it easier to find the part you lost. Don't play with the cat at this time, save it for later. Arrange for NO INTERRUPTIONS while you perform this work. Take the phone off the hook. Make any notes you need to perform reassembly. NOTE: I departed from the popular advice and used a very expensive medium consistency grease. I don't want to debate my choice, based on two mechanical engineer's opinion. Use what you like.
- Keep track of how many washers are between the rear cap and the body of the PTO. There may be only one each side, or up to three. Try NOT to dislodge the nuts which are glued to the plastic piece INSIDE the PTO. It will make it easier to reassemble if they remain where they are.
- When you remove the rear cap, do not lose the spring, the ramp washer or the nylon washers (D). These washers can easily be ignored when cleaning the gunk out of the rear cap.
- You can leave the rear cap soaking in a small container of alcohol while you proceed. Do not soak over a half hour, disassemble and clean parts. DO NOT LOSE THE NYLON WASHERS OR RAMP WASHER IN THE GREASE.
- IMPORTANT: DO NOT REMOVE THE STOP PIN (H) FOR A SIMPLE GREASE JOB. THIS SMALL DOWEL PIN IS DIFFICULT TO REINSTALL, AND ALL THE CLEANING AND GREASING CAN BE DONE WITHOUT THIS STEP. If you lose this dowel pin, you are screwed, unless you can find another one in McMaster-Carr.
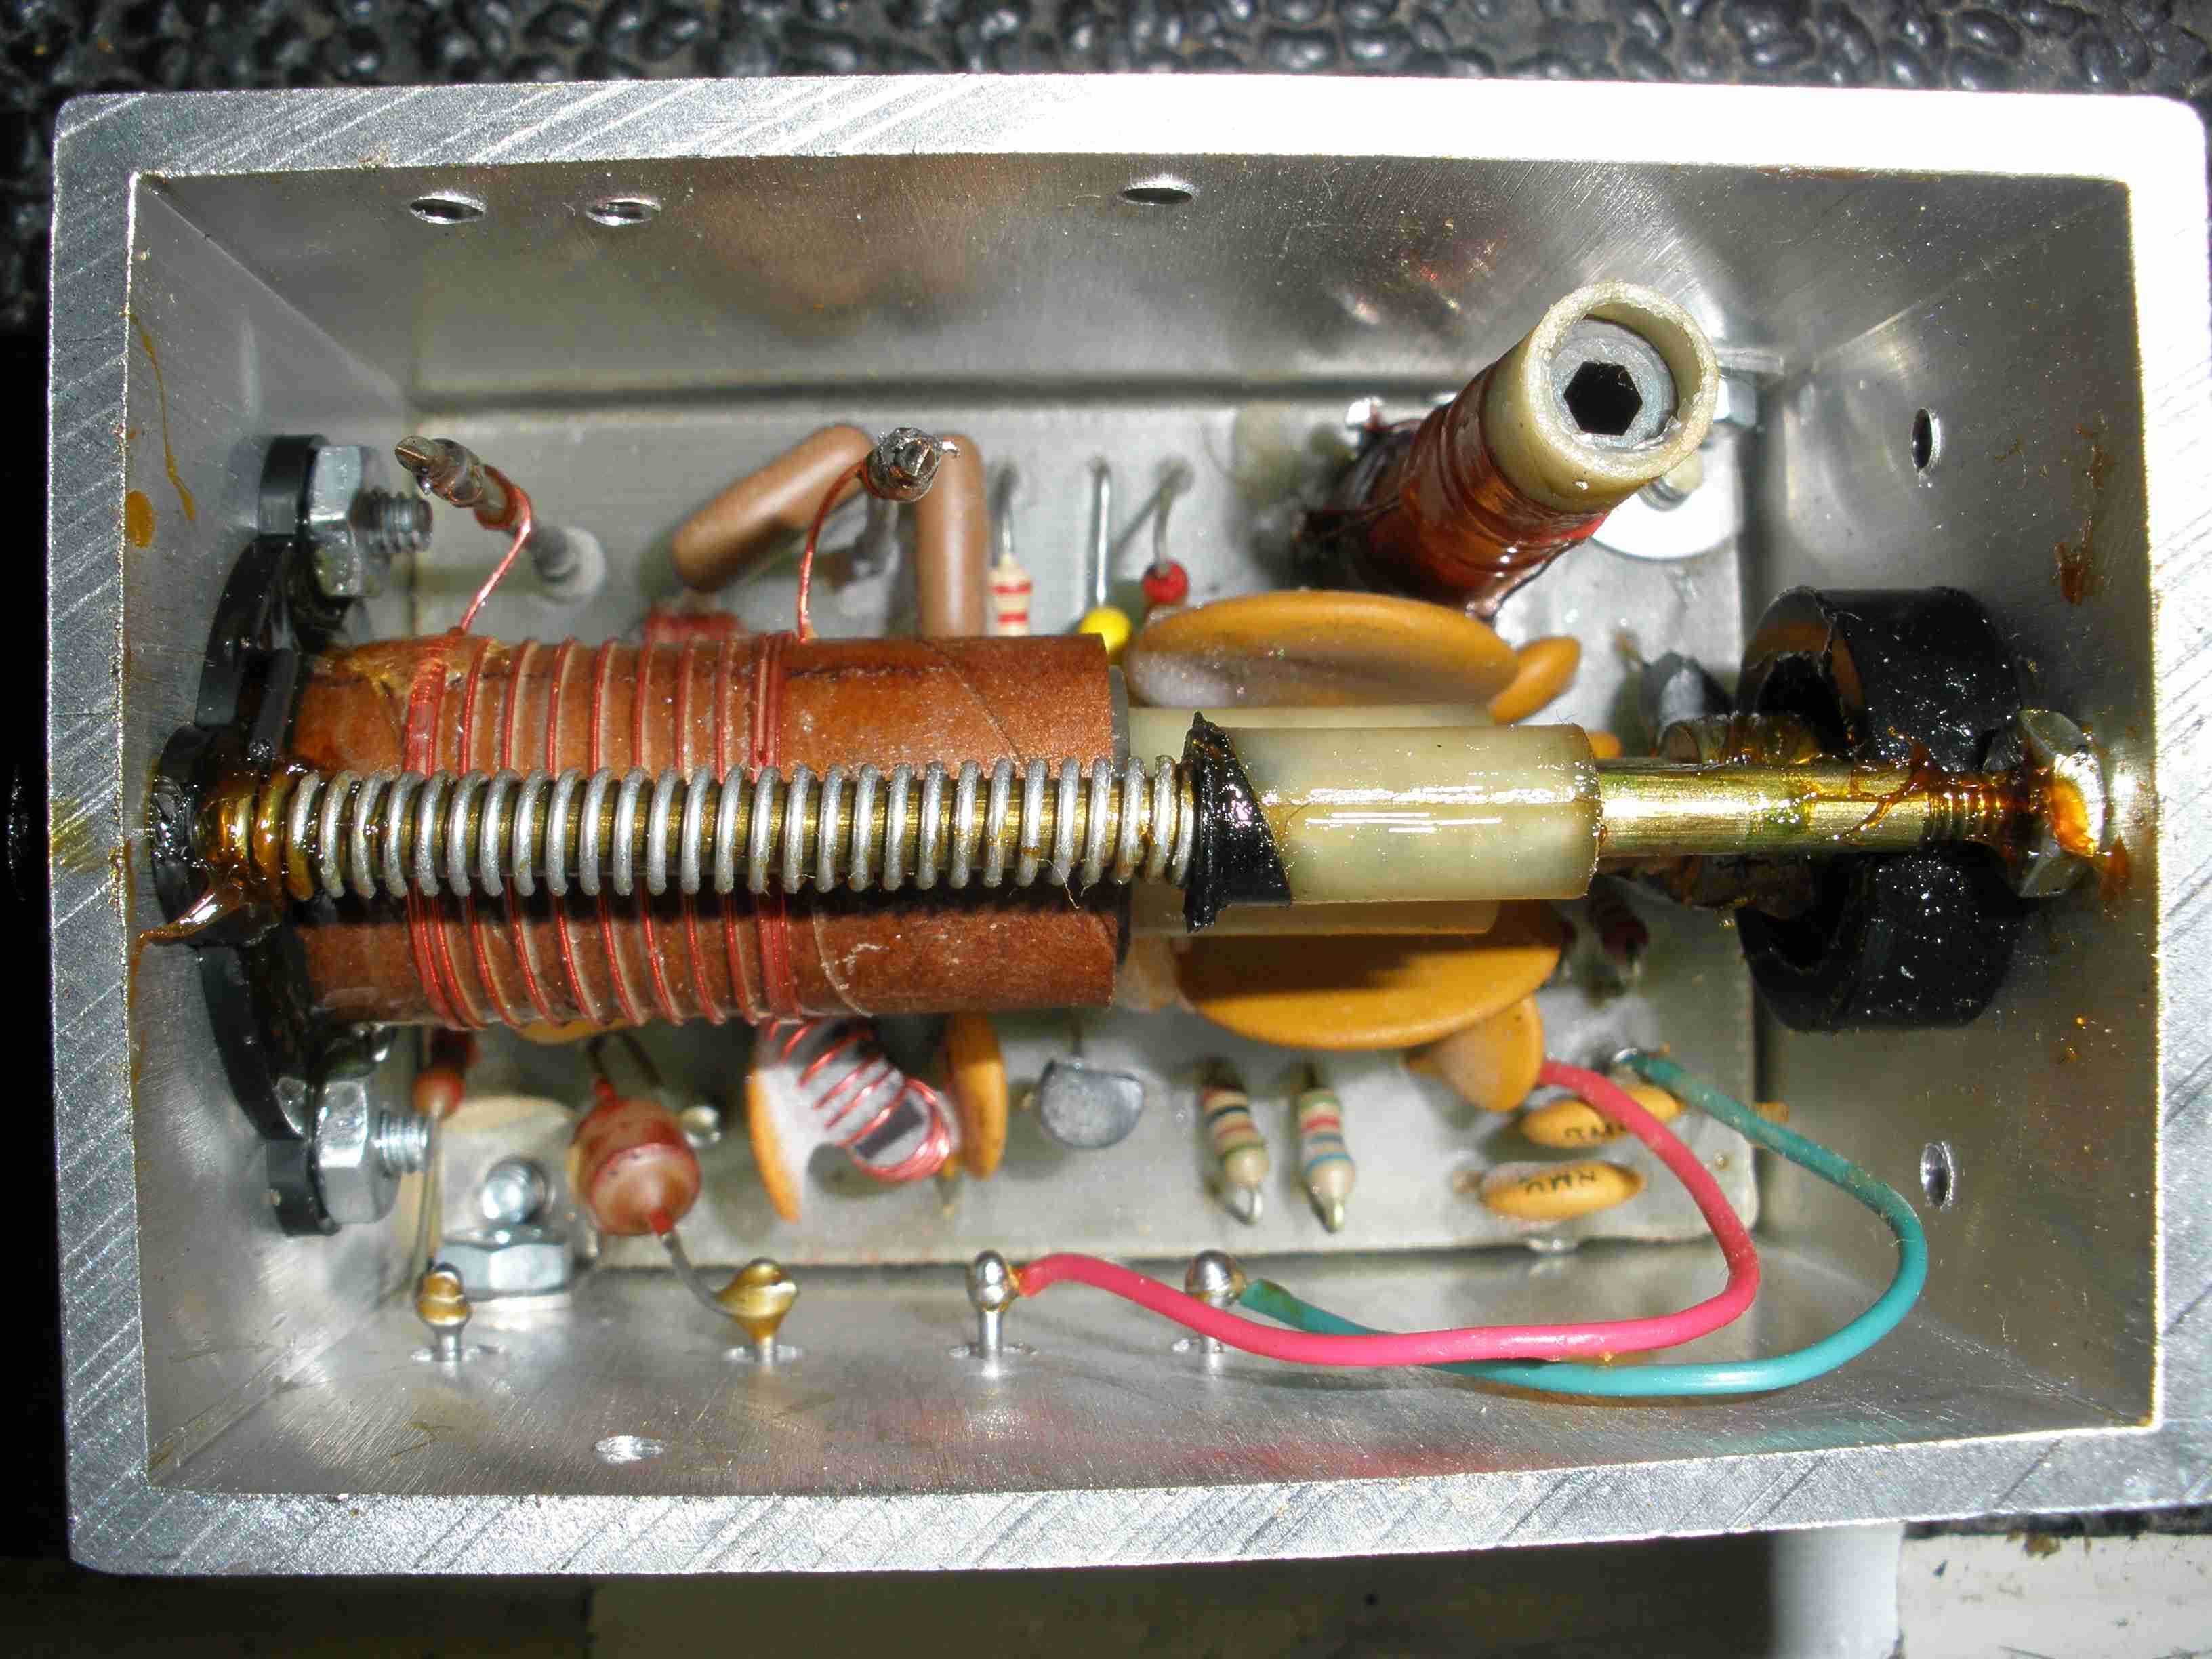
- You may have to clean some of the sticky grease from the top rail with the spring to get further. I use Isopropyl Alcohol for this. It does not attack the plastic parts, and eventually it will dissolve the old grease. Once you clean that up, use a an eye dropper to put alcohol in the rear where you removed the rear cap. Clean the front of the brass tuning assembly that goes in the coil with alcohol. Some of the alcohol you put on the shaft and worm gear on the back will penetrate through to the front. Eventually you will be able to rotate the core drive. DO NOT FORCE ROTATION OF THE SHAFT. Once you have freed the pistol to move and the brass core drive rotates without binding, you can push the front of the core drive backwards, exposing the 3 ball bearings (I). Remove the tuning shaft (J) and clean it. Invert it and install the outside (knob) end inside the core drive rod (K); this will push the bearings out to where you can grab them with tweezers. Do not scratch or deform the ball bearings.
- DO NOT REMOVE THE CORE DRIVE!!!! You cannot get it out without removing the stop pin (H). You can push the core drive backwards and work the alcohol into the assemblies to free it. You can gently turn the shaft and apply alcohol to the threads in the rear til it turns freely. A Q tip is helpful to clean the worm gear sticking out the back. Be sure not to get lint into the PTO; replace the Q tip before it gets frayed. Clean the tuning shaft thoroughly. Inspect the groove for the ball bearings. When it was new, this was a V shaped taper with straight sides. Likely there will be some wear, but do not dispair. The strong spring in the back applies pressure and it will work if cleaned and greased. You do not have this part to replace it. You could get one made in a machine shop.
- Skip step 7
- Skip step 8.
- DO NOT REMOVE THE BEARING RACE. Clean out the grease with a jeweler's screwdriver used as a shovel. When you get most of it out, use an alcohol soaked Q tip to clean the rest. Push the shaft back to get access to the bearing race (Q). The bearing race (R) and the retainer (Q) will likely be lose now because the alcohol has dissolved the glue holding them to the front panel of the PTO. This is OK for now, you can use a very small amount of super glue to hold them to the front panel when you reassemble it.
- DO NOT REMOVE THE PISTOL. CLEAN IT IN PLACE.
- Clean everywhere you can reach with alcohol till it rotates and pushes back and forth smoothly. Do not get upset if you reassemble it before you grease it and the tuning shaft (J) does not turn the core drive rod at this point. The grease and rear cap will apply pressure to make it all happen. Page 2:
- Push the core drive rod backwards, exposing the worm gear. Apply grease to the worm gear. Do several rotations repeatedly regreasing each time til it turns smoothly. Grease the front of it too, turning the shaft to expose all of it. This is key to getting smooth operation.
- Clean these parts thoroughly or the glue won't stick. Use a drop of superglue to fasten the bearing race and retainer cup to the front panel. Take a coffee (or stronger drink) break while the glue dries. You earned it.
- Grease the rod (N) and spring (P) using a Q tip. It must be thoroughly clean of old sticky grease. If you can feel its sticky, it isn't clean. You do not need a lot of grease here, avoid excess; make sure the brass slider rod is coated and moves freely.
- Grease as instructed.
- My grease came in a tube like toothpaste. I squeezed some into the core drive. I used the tuning shaft as a ram to push it down into the assembly, till it oozed out the bearing holes. Turn it to distribute the grease.
- Push the core drive to the rear. Aren't you GLAD you did not remove the pin (H) now? Imagine holding against the spring pressure, and installing the pin. What fun!
- Insert the ball bearings back in the holes in the core drive. The grease will hold them in if its tacky enough. Gently release the pressure on the core drive and let it seat the ball bearings against the bearing race. Fill the bearing race with grease and operate the core drive. You can test the tuning shaft operation by applying some pressure with one finger on the part that sticks out the back and would seat in the rear cup.
- After you clean all the parts you found in the rear cap, reassemble them as instructed.
- On a digital rig, you do not need to install the front pin (H). This is only used for the dial cord on the analog display or the 243 external VFO. If you lost the original pin in the back, you have this one as a spare. Save it for future use, it can bail you out. You had to remove this to get the PTO apart enough to grease it. If the PTO moves through its full range without binding or slipping, you are good to go. Reinstall it in the rig.
- Inspect the tuning coils L2 and L3. They should be about 1/8 inch into the coil. Make sure the slugs turn free in the coil before reinstalling the PTO. My external VFO had been badly tampered with, and the slugs were both turned all the way in til they met. I was able to unscrew them level with the top of the coil form and recalibrate it perfectly. The external VFO needs to match the analog scale to indicate frequency. In a digital display OMNI, I set the slugs for about 30 KHz overtravel on either end of the band. You can do slightly more if you need to operate out of band for some reason.
Let the alcohol evaporate off overnight. Come back to this in the morning and reinstall the PTO in the rig.
IMPORTANT TIP: Use a piece of dental floss or heavy button thread to hold the spring clip on the dial skirt up to reinstall it on the core drive. This method works much better than the method shown in the OMNI manual, which requires a special tool or very small screwdriver. DO NOT FORCE THE SKIRT BACK ONTO THE TUNING SHAFT! You may break unobtainium plastic parts.
You have given new life to your OMNI or Corsair. Enjoy.
For my OMNI, I plan to replace multiple electrolytics after I have a period of successful on air operation. These are easy, if you remove the boards one at a time.
Be sure to replace the large electrolytics inside the frequency counter can and at the right rear of the chassis on the top side. Also replace the two small capacitors on the outside of the PA compartment, where the large red wire attaches. This rig was built in 1980, and the electrolytics are due for renewal. Don't forget to do the same in the power supply also.
One other note: Drift or frequency jumps can occur from a dirty pot R21 "VFO shift" on the 80455 VFO Mixer/Oscillator board. Clean this pot and adjust it per the manual.
Click on any page below to enlarge it or download the entire set using the zip file box. To download one page, right-click it and choose "save link as".
 Parts List Parts List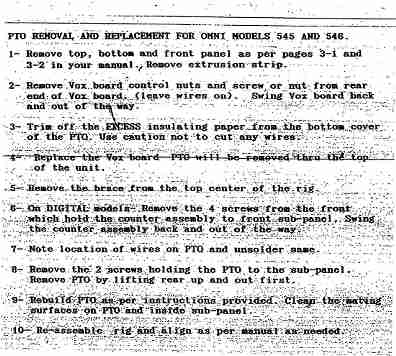 Page 1 Page 1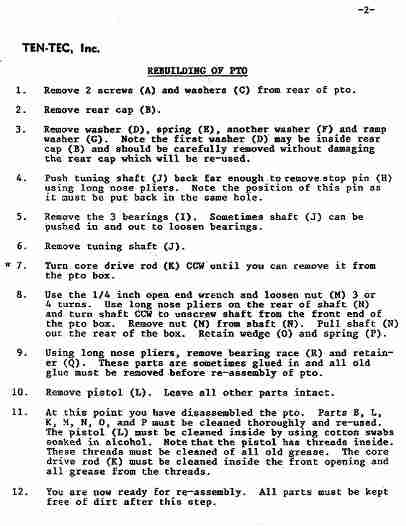 Page 2 Page 2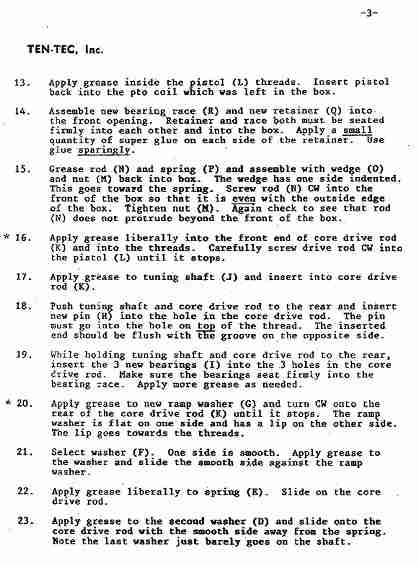 Page 3 Page 3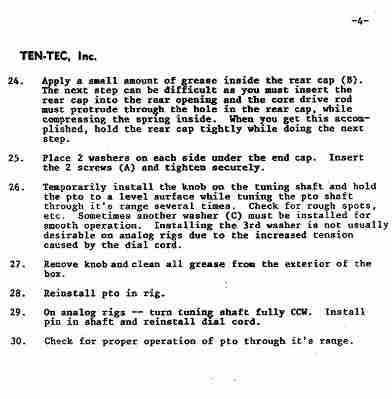 Page 4 Page 4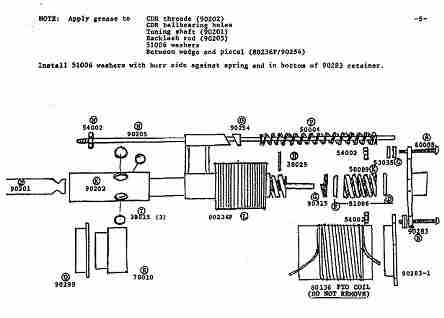 Page 5 Page 5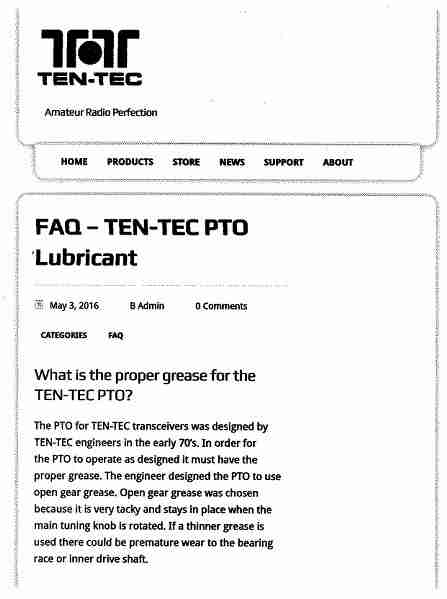 Page 6 Page 6 Page 7 Page 7 Page 8 Page 8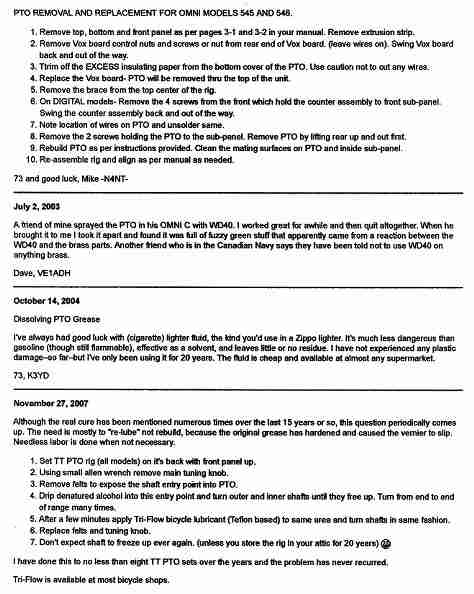 Page 9 Page 9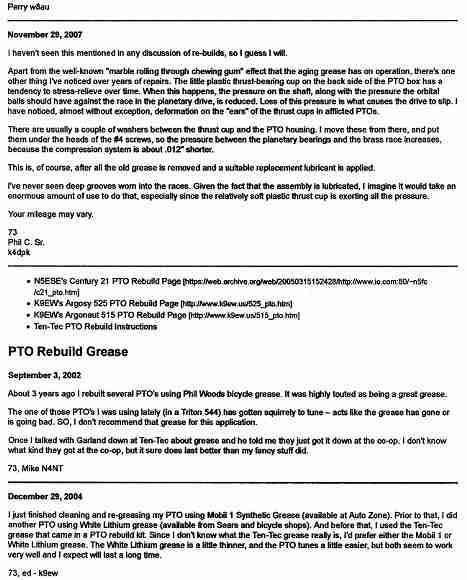 Page 10 Page 10 Click to download Click to download
Related Projects (coming soon)
OMNI 546  OMNI External VFO Model 243
Corsair I & II
Corsair Eternal VFO
OMNI External VFO Model 243
Corsair I & II
Corsair Eternal VFO
|